Sunday, January 18, 2009

Wing Vents

Been thinking about fitting wing vents for some time to help improve the cooling, couldn't really find something that looked right. Finally found these, basically copies of the later BMW M3 wing vent.


Took a fair amount of time before I summoned the courage to attack the wings but once I started there was no turning back.


Used an angle grinder with a slitting disc to remove the baulk of the material then finished it of with my die grinder. Had a couple of small bits to touch in, painted it with a fine brush then flatted back and polished.


Quite happy with how they look, I was originally thinking of painting the black part body colour but decided to leave it as it is for now.

Just need to get a couple of badges made to replace the M3 ones.

Wednesday, September 17, 2008

Club Triumph Round Britain Reliability Run

2,000 Miles in 48 Hours Driving a 35 Year Old Classic Sports Car with two Old Classics at the wheel !

This may sound like a crazy idea but it is for Charity.

Mike Bestard and Darren Hughes will be taking part in the Club Triumph Round Britain Reliability Run in October using Mike’s 1973 Triumph GT6. This charity fund raising event which has been held bi-annually since 1966 starts and ends in London.

In order to qualify for a successful completion the entrants need to visit 15 pre arranged check points within 48 hours, a distance of around 2,000 miles with check points as far apart as John O’Groates and Land’s End.

This year 120 Classic Triumph cars will attempt the journey and will be raising money for the RNLI, the combined sponsorship target is to raise at least £50,000

If you would like to sponsor us, please use the attached link

http://www.justgiving.com/mikebestard

Friday, September 5, 2008

Type 9 - Job Done

Seems like I have been working on this conversion for ages, well its finally fitted and up and running.

Only been for a quick run as its been raining quite heavily today, hopefully get out over the weekend, all seems to work ok.

The following picture shows how much of the original selector mechanism had to be cut away to fit in my shortened remote.

I had to make a new bush to support the selector shaft as the original is completely removed when shortening the remote housing.

The selector rod had to be cut down to match the housing.

The completed box with the adapter plate and a quickshift conversion that came with one of the scrap boxes I bought of ebay.

Chassis welded and treated to some fresh paint, new mounting plate bolts to the underside of the chassis rails.


Gearbox in place, fairly straightforward to fit, uses the 1850 Dolomite clutch that I already used.

Had to make a small mod to the gearbox tunnel, basically moved the top half of the tunnel 25mm backwards, you can just see where it was glued.

All fitted, I now need to find a suitable gear knob and decide what length to make the gearstick.

Currently having some adapter plates machined, if your interested please get in touch. They are currently working out at £100 plus P & P. These have been designed primarily to fit the GT6 / Vittesse so not sure of there suitability for the 4 cylinder set up. They could probably be adapted to fit, the main difference I am aware of is the clutch mounting point.


Sunday, August 31, 2008

More Type 9

Been doing a bit more work with the Type 9 conversion

Used a stripped out box for a trial fit, makes getting it in and out easier. Fabricated a new rear mounting plate which then uses a Carterham / Westfield gearbox mount.

Had the new propshaft made...............

The following picture shows the modifications that were made to the chassis, you don't really need to remove quite as much as I have but I was playing around with a couple of different mounts, you can get the rear of the gearbox quite low if you use an original Sierra gearbox mounts, didn't go for this option as I thought it would interfere with the exhaust system.

Once I was happy with the clearance I drilled a number of holes with a spot weld cutter around the modified area and puddle welded just to make sure there was plenty of strength.

Also finished of the gearchange, all seems to work ok on the bench, getting quite good at understanding how these things go together as it took me three attempts at getting the gearchange to work correctly, this is partly my own fault as I have cut quite alot of the original remote housing away, this was all done with the intention of getting this gearbox to fit under a standard gearbox tunnel, sadly that is not going to be possible, I will need to make a minor modification but it shouldn't be noticeable, more to follow on that.......

All that's left to do is fit some new seals and gaskets, they should be here early this week so it should all be fitted by next weekend.

Just the exhaust to refit, need to tighten up the 3 into 1 collector as it was starting to blow a bit, also have a slight leak from the manifold so I might as well do it all at the same time.

This then leads me to another dilemma, seriously considering trying a TR5 camshaft that I had fitted in my original engine, with all the manifolds off its not too much more of a job to pull the head off and change the cam at the same time, only problem I have is that the RBRR is quickly approaching, decisions, decisions.

Looking forward to a productive week as I'm between jobs at the moment so I can get to spend some quality time in the garage........

Sunday, June 22, 2008

Diff Gone Bad

After breaking the diff last weekend, finally got round to changing it this morning.

Not very pretty, good job I've got another to drop in.........


Dont think there's too much I can re-use from this lot

Going to start looking at what other diffs could be fitted, currently looking at Sierra, Subaru and Freelander.

I'll probably do the change over the winter as I have a loose plan to convert the rear suspension to coilovers using rotoflex uprights and CV'd drive shafts.

Saturday, May 31, 2008

Type 9 Gearbox Update

Finally got the CAD model sorted for the gearbox adapter and had the first one machined, fits ok although we have adjusted a couple of the dimensions after trying it on several boxes.


Had the first rear housing welded up, just need to make a support bush and re-drill the selector shaft, managed to move it forward by 107mm, looks like it should work ok.


Managed to pick up a couple more gearboxes of eBay, got a couple of 2.8 boxes which have a slightly taller first gear.

One thing to watch out for if you are considering fitting a Type 9 is there are a variety of input shaft dimensions, I have four boxes and three different lengths of input shaft. Learnt this today the hard way after fitting everything onto one of the boxes I had lying around, bolted it all to the back of an engine only to find out that my measurements were 20mm out, input shaft was only about 5mm into the flywheel. After alot of head scratching and thiking about other conversions / adapters I had seen, finally realised that the input shaft was 20mm shorter, must get myself a Type 9 gearbox manual.

Next job is to sort out a rear mounting, picked up a Sierra mount but I think it will be too wide to fit between the chassis rails. Been looking at what else is available and came across the one below which Westfield sell, bit pricey at £20 but may be the only option.

Been quoted around £100 for the propshaft from Dave Macs in Coventry, cant really order that untill the gearbox is fitted and I can give them the correct measurements.

I estimate that the gear lever position is going to be 35 mm back from its current position, still hoping it will all fit under the originall tunnel cover.

Plan is to have it all up and running for the RBRR (Round Britain Reliability Run) in October, hopefully sooner...................


Prescott

Had a great day out down at Prescott, managed to put a few more names and faces together.

Couple of clips of Dave Walker's 2500 Vitesse and my car in action


Saturday, March 29, 2008

Top Link Trial Fit

Managed to get another set of top links welded this week so I thought I'd trial fit them on my own car, the plans to get them on to Dave's Vitesse never materialised as he had to prep his Lemon for its MOT.

They certainly give the much needed wheel arch clearance required, the first photo shows how much the wheel sticks out past the wheel arch, had to run the front end fairly high to try and avoid my tyres being shredded.


The next photo is with the new top arms fitted.


With the spring and damper removed I was able to jack the wheel up well into the wheel arch.

This may look close but those are 215 tyres that are being stuffed in.....

I was expecting to have to modify the shock towers on the inner edges to clear the new arms. The attached photo shows the flanges bent back, I will probably end up removing about 5mm of material from the front edge to make sure there is enough clearance.

It didn't all go to plan, the top arms are very close to the spring when the suspension is unloaded, the brass adjuster and inner end of the top ball joint can touch the spring so careful positioning of the spring is required. Not good news as I was hoping these would be a direct replacement.

The following picture shows the car at its normal ride height with 1 degree of negative camber with no lower shims fitted - all clear.

The next photo shows the suspension unloaded, the brass adjuster will touch the spring. It is unlikely it will ever get to this condition while driving but I would have liked a bit more clearance.

I have a couple of options apart from living with it as it is, make the track rod end fit similar to Caterham, they have the top tube threaded and one lock nut on the outside, the down side of this is that you need to split the ball joint to alter the camber.

Or the second, would be to try it with 2 1/4" ID springs, after some very rough measurements were taken, I reckon they are about 3/8" smaller in diameter than the springs I currently have fitted, this should give me the extra clearance I need.

The good news is that Dave's Vitesse is already fitted with 2 1/4" ID springs so we can hopefully check them on his car next week.

Monday, March 24, 2008

Type 9 Gearbox

Managed to get myself a reconditioned Type 9 gearbox as a favour for doing some engine management work, its seemed a shame to start hacking around within it so I also got myself one off eBay, bargain £30.

My plan is to try and fit it without modifying the gearbox tunnel. I had been told that you can shorten the remote by 75mm, this still leaves me around 60mm short of the original gear lever position.

My first bell housing adapter is 30mm, once I am happy with the positioning, I will have another made from 25mm, In fact I ordered 10 billets so if your considering fitting a type 9 get in touch, I am currently having it drawn up in CAD so that I can have a batch CNC machined.

I have cut the tail housing as far as I can, with some major surgery I think I can shorten the remote by 105mm.


I have cut the rear casing almost back to the selector shaft seal.

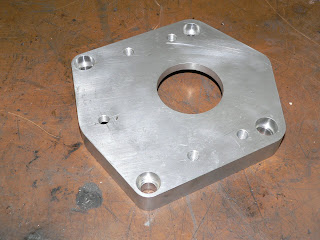
The original remote housing has also be cut down as far as possible, the front section needs to be welded back on and then machined flat, I will also fit a small bush to support the selector shaft. This will then be welded to the tail housing.

The cast selector lever will need to be cut down by 10mm to fit into the smaller housing.

Hopefully this will give me a gear lever position 25 / 30mm backwards from current position, not sure if this will fit under the tunnel, that's a job for another day.

Top Arms

Still not yet got around to trial fitting, hopefully that will be sorted when I fit a set to Big Dave's Vitesse.


Fairly confident these will go on without a problem and hopefully create the required clearance, Dave's car is probably worse than mine for tyre to arch contact.

Managed to win an eBay auction for an adjustable tool post for my lathe, wasn't a straight forward fit but eventually got it sorted. I have modified one of the tool holders to hold the tubes so that I can cut the angles more accurately.


Now using a milling cutter which gives a much better finish, quick rub over with the file is all that is needed.

This set should be getting tigged up this week, need to order up some material to make the adjusters, going to have a go at using brass.

If these turn out ok, I will consider making a number of sets to sell on, I have been contacted by a number of people expressing an interest.

If you are considering ordering a set of these, please bear in mind that they are a critical suspension component, they will be made to the highest standard but I sugest they are inspected on a regular basis.

If you wish to fit these to your vehicle it will be at your own risk.

Post Options
Labels for this post:
e.g. scooters, vacation, fall


Update

Cant beleve its been 3 months since I last updated the blog, even worse not really done any work on the car, taken me a while to get going this year.

To get me into garage mentality, I agreed to help a friend restore a Mini, this has meant putting my car in another garage.


Having said that, it has got me back in the garage so I've been tinkering with other bits and pieces.

Tuesday, January 1, 2008

Happy New Year

New Year and time to get a to-do list together

In no particular order the following is a list of things I need to look at over the coming months, by hopefully putting them in print it will spur me on to complete some of them. Some of these are more achievable than others............

Fit the remaining interior trim, carpets arrived before Christmas, everything else is ready to be fitted.

Got a 4.11 diff that I'd like to try and compare to the 3.89 currently fitted.

Re-pack exhaust silencer, its starting to get a little noisy, also thinking about making up a centre pipe with a "cherry bomb" type silencer.

Make some new spindles for my throttle bodies and fit sealed roller bearings, also want to move the TPS switch to direct acting on the end of one of the throttle spindles - currently fitted on the end of the under slung linkage.

Complete and fit adjustable top arms.

Design and fabricate lower arms to take lower spherical ball joint.

Fit Caterham vertical links, AP calipers, vented disks etc.

Slight oil leak from the pushrod side of the head gasket, I'll monitor this over the next few weeks now that the engine breathing is sorted - otherwise I'll do this when I work on the throttle butterflies.

I've already cut up and re-welded my 3 into 1 collector as the exit pipe extended about 2" into the collector, might take a look at the primary to secondary collectors and see what's going on inside them. Also thinking about extending the 3 secondary pipes to the meet up at the back of the gearbox.

I'd like to get my car down to Emerald's rolling road for a mapping session sometime, probably after I've played around with the exhaust.

Like to get hold of some 195/40 R16 tyres to try in place of the 215/40's that are currently fitted, interested to see how it will effect the gearing and it will give me slightly more clearance - with the car fully loaded for the 10CR (No lowering block) I had very slight rubbing to the rear inner edge of the back wheel arch, also fouled on the front but hopefully the top arms will sort this.

Possibly change the gearbox to a 5 speed, probably Type 9, need to look at a few installations in other GT6's as I want to retain the original gearlever position. Also been looking at other options, Mercedes have a 6 Speed box that looks fairly compact, not seen one in the flesh yet so it might not be any good - would probably need to fabricate a new engine backplate if I went down this route - only ideas at the moment.

Look at doing something with the rear suspension, there are a couple of like minded people toying around with ideas at the moment so I might hang fire on this one, davesideways has some thoughts and more locally Andy Smith is building a V8 Vitesse and is keen to upgrade the diff and rear suspension. My ideas at the present are along the lines of some of the tried and tested stuff, Rotoflex uprights, MGF hubs and Metro driveshafts, I'd like to do away with the swing spring and go for coilovers mounted in the original shock positions. For starters I am thinking about bolting a box section to the top of the diff to give me top arm pick up points. Long term these could be fabricated on the chassis which would then give me the freedom to change to a stronger diff if required (Ford, Subaru, BMW all have LSD units available fairly cheap on ebay).

The gearbox and diff mods will all be dependant on how the current items perform, I would like to keep as much of the "original" drivetrain as possible, but there is enough evidence around to suggest that they wont last forever.

That's about it for the moment

If you are sitting there wondering why I am bothering to do the above modifications, I totally understand, I felt the same way when I started reading other peoples modifications, don't really have any defence, I like doing it and it becomes a challenge looking for the next improvement.

HAPPY NEW YEAR

Sunday, December 30, 2007

Engine Breather

Managed to get out in the car over the Christmas break, I was keen to see how my PCV valve worked - I was looking to see how much crankcase depression I was getting in various engine conditions - my measurement method was a digital manometer hooked up to my dipstick tube. Didn't get very far before I realised my first simple in-line valve was giving me too much depression, it wasn't able to control the pressure. The downside of this is that in extreme overrun I could potentially suck the oil into the intakes.

Time for Plan B, I had picked up a diaphragm type PCV valve, only problem was finding somewhere to fit it, no room on top of the intake manifolds.

After some pondering, decided to use my redundant distributor mounting, This needed a bit of machining to make it suitable, I also added a fixing point to hold the valve in place.

Not sure where I originally picked up this valve.

The valve pushes into the modified distributor housing and is held in with a small cap head bolt.

Fits quite neatly on the side of the block

Plumbed into the intakes via some 1/2" tubing pressed into the end of the manifolds.


Checked everything was fitted ok and started the engine, my pressure gauge was showing a 15 mbar depression at idle. Took it out for a drive, subjecting it to various operating conditions, the valve seemed to pretty much maintain a constant 15 mbar depression +/- 10 mbar. The original engine breather is now the fresh air into the engine crankcase and is fitted with a small restrictor to create the depression. With no restrictor it would be like having an air leak post throttle in the intake system.
Didn't get much else done, really need to trial fit my front upper wishbones - once I know they fit of I can get on and make another set with the thicker wall tubing and then ream the internal bores to the correct size.