Tuesday, September 18, 2007

Monday, September 17, 2007
Let There Be Light
Not really happy with the lighting following the 10 CR, never really noticed any issues in the past, then again never really had to drive it all night before. The biggest issue was the amount of glare / refection created when using main beam.
After looking at a TR6 recently at KD Triumph that had a HID kit fitted I was pretty impressed with the installation, I have HID's Xenon's on my everyday car so I'm well aware of the improvement they offer.
A quick search around the Internet and I came across a Bosch HID kit for a fairly reasonable price.

Fairly straight forward to fit, you get all the necessary brackets and fixings. There is a unit that needs to be fitted behind each lamp, I fixed these to some existing fittings on the wheel arch. There is also a control module that needs to be fitted on one side only, this needs an additional 12V feed. It also has a fly lead which plugs into the existing bulb connector. The bulbs basically fit the same as standard H4's, they just connect up to their own harness.

Difficult to show in a photograph but the light is much whiter and brighter as expected, they make the sidelights seem really yellow. I'll have to plan a night drive and see how they perform.
After looking at a TR6 recently at KD Triumph that had a HID kit fitted I was pretty impressed with the installation, I have HID's Xenon's on my everyday car so I'm well aware of the improvement they offer.
A quick search around the Internet and I came across a Bosch HID kit for a fairly reasonable price.
Fairly straight forward to fit, you get all the necessary brackets and fixings. There is a unit that needs to be fitted behind each lamp, I fixed these to some existing fittings on the wheel arch. There is also a control module that needs to be fitted on one side only, this needs an additional 12V feed. It also has a fly lead which plugs into the existing bulb connector. The bulbs basically fit the same as standard H4's, they just connect up to their own harness.
Difficult to show in a photograph but the light is much whiter and brighter as expected, they make the sidelights seem really yellow. I'll have to plan a night drive and see how they perform.
Sunday, September 16, 2007
Club Triumph 10 CR
What a trip................

I was a little apprehensive about doing this trip, mainly because my car had only covered about 2500 miles since its rebuild and I was about to double it. I needn't have worried, the car ran very well. I had spent the last couple of weeks checking, greasing etc etc and did not really expect to have any issues but you never really know in a car that is over 30 years old.
We averaged 27/28 mpg over the 2500 miles, 35 mpg was the best and 21 mpg the worst while tackling the mountain routes around Stelvio.
At one point we did suffer steering column shake and vibration but this was quickly diagnosed when the radio fell out and I realised that the H frame bolts had come undone.
We had another issue with a change in exhaust note and strange vibration which did get me a little worried, once we pulled into the service station this changed to a rattle from under the car, after a quick inspection, I found that the exhaust hanger U bolt had come loose, this was tightened and everything was fine again.
Apart from a little tyre to bodywork contact, that's about it.
I did learn quite alot about the car, this has given me a couple of things to investigate.
I had fitted 100 Watt bulbs for the event, while these were superb in complete darkness, with no reflective road markings or signs, If you tried to use main beam on anything reflective you were immediately blinded. My plan to overcome this is to fit some HID lights, they'll be the topic of another post.
My car handled exceptionally well, even in very wet conditions, what it didn't like was crossing road expansion joints in mid corner at high speeds, this became quite uncomfortable when going through series of tunnels during the trip. Not sure what I'm going to do about this as I cant slow down....... I think it looked more dramatic from the cars that were following as the car moved around. I don't plan on changing the wheel and tyre set up so I think I will have a mess around with the damping.
Developed a couple of oil leaks, one from the head gasket and one from the front crank seal, all pretty much standard stuff.
Might have a play around with diff ratios as the car does lack a little pull away performance, I think this is due to having 215/40 R16 tyres. I'm currently running with a 3.89 diff, I plan to swap this in the next few weeks to a 4.11 and see how that goes. I will happily trade some top speed for more acceleration.
I guess the only other thing to mention is that I had a pretty good co-driver, my brother Andy, he was quite happy to sit back and let me drive, when he did drive, he respected the fact that this was my car. We also met some great people during the event, only problem being that I didn't really remember any names but I'm sure we will meet up on future events.
The following link should take you to a short video of the GT6 at the Nurburgring http://uk.youtube.com/watch?v=_Ut2zz2841w
Thanks to Ellis and all at Club Triumph who organised the event.
I was a little apprehensive about doing this trip, mainly because my car had only covered about 2500 miles since its rebuild and I was about to double it. I needn't have worried, the car ran very well. I had spent the last couple of weeks checking, greasing etc etc and did not really expect to have any issues but you never really know in a car that is over 30 years old.
We averaged 27/28 mpg over the 2500 miles, 35 mpg was the best and 21 mpg the worst while tackling the mountain routes around Stelvio.
At one point we did suffer steering column shake and vibration but this was quickly diagnosed when the radio fell out and I realised that the H frame bolts had come undone.
We had another issue with a change in exhaust note and strange vibration which did get me a little worried, once we pulled into the service station this changed to a rattle from under the car, after a quick inspection, I found that the exhaust hanger U bolt had come loose, this was tightened and everything was fine again.
Apart from a little tyre to bodywork contact, that's about it.
I did learn quite alot about the car, this has given me a couple of things to investigate.
I had fitted 100 Watt bulbs for the event, while these were superb in complete darkness, with no reflective road markings or signs, If you tried to use main beam on anything reflective you were immediately blinded. My plan to overcome this is to fit some HID lights, they'll be the topic of another post.
My car handled exceptionally well, even in very wet conditions, what it didn't like was crossing road expansion joints in mid corner at high speeds, this became quite uncomfortable when going through series of tunnels during the trip. Not sure what I'm going to do about this as I cant slow down....... I think it looked more dramatic from the cars that were following as the car moved around. I don't plan on changing the wheel and tyre set up so I think I will have a mess around with the damping.
Developed a couple of oil leaks, one from the head gasket and one from the front crank seal, all pretty much standard stuff.
Might have a play around with diff ratios as the car does lack a little pull away performance, I think this is due to having 215/40 R16 tyres. I'm currently running with a 3.89 diff, I plan to swap this in the next few weeks to a 4.11 and see how that goes. I will happily trade some top speed for more acceleration.
I guess the only other thing to mention is that I had a pretty good co-driver, my brother Andy, he was quite happy to sit back and let me drive, when he did drive, he respected the fact that this was my car. We also met some great people during the event, only problem being that I didn't really remember any names but I'm sure we will meet up on future events.
The following link should take you to a short video of the GT6 at the Nurburgring http://uk.youtube.com/watch?v=_Ut2zz2841w
Thanks to Ellis and all at Club Triumph who organised the event.
Monday, August 27, 2007
Six Pack
I Wish..............


Couldn't find anybody locally that had a new distributor cap in stock on Saturday morning, so I decided to pull my plans forward and fit a wasted spark ignition system using a six pack coil. Originally I was going to do this after the 10CR but I got carried away.
Managed to pick up a couple of second hand coil packs and leads on eBay, I used a Mondeo V6 coil and cut the leads to suit.
Dead easy to wire in and set up, just a couple of extra wires to the ECU and then reconfigure the software to run a wasted spark system.
The most time consuming part was making a new bracket for the coil and blanking off the distributor hole.
I basically hacksawed my old distributor mounting casting, this was loctited in place leaving a small clearance to the oil pump drive shaft. I then made a plate, sealed it with RTV and bolted it in place.
Following a test drive, this seems to have cured my 6000 Rpm ignition issue, I now seem to have another issue up around 6800 - 6900 Rpm. Not sure if I need to fit stronger valve springs or I'm having issues with the crank trigger signal.
My trigger wheel is mounted on the back of my crank damper, not sure if the damper is resonating and causing an issue, I think this is unlikely as I'm able to log all the engine signals and all appear to seem OK - I need to investigate further............
My valve springs were bought from Chris Witor, I'll give him a call in the morning a see what he thinks.
Friday, August 24, 2007
Rolling Road
Spent the last month getting my car ready for the 10 CR, one of the main jobs has been to switch from my existing ECU to an Emerald K3. After making a new harness, trigger sensor bracket etc etc, finally got it up and running two weeks ago.

Spent the last couple of weeks mapping but couldn't get rid of an issue around 6000 Rpm, decided to get it booked in for a rolling road session. It was always the plan to optimise it on a rolling road, my only concern being that if the engine let go, I would be out of the 10 CR.
I'm glad to say all went well, the guys at Thor Racing managed to squeeze a bit more power and torque out of it. As with all figures these will vary from day to day, rolling road to rolling road however they do give an indication.
107 lb/ft @ 5580 Rpm
123 Bhp @ 6194 Rpm
Didn't manage to fix the 6000 Rpm issue but did a bit of investigation, basically its looking like a distributor cap issue, off to buy a new one in the morning.
A bit unfortunate as it was looking like there was a bit more power to come, I'm planning on setting the limiter at 7200 Rpm.
Sunday, May 27, 2007
Aerodynamics
Numerous people have told me that the reasons why GT6's get so hot under bonnet is down to poor air flow and that what I need is bonnet vents, while this may be true I don't want to hack holes is my bonnet without understanding what is going on.
I have fell into the trap of believing the more air I get into the engine bay the better things will be, I am now starting to doubt this. It originally suited me to have maximum clearance at the front of my bonnet as it allowed me to get my radiator in without fouling the bonnet. The down side of this is that at high speed the bonnet can be seen to lift and starts to move around - this suggests to me that I have a high pressure area under bonnet which in turn leads to poor airflow through the engine bay. After reading several articles I have decided to try and understand what is going on aerodynamically. I plan to take numerous pressure measurements around the front of the vehicle / engine bay / under chassis in a bid to come up with some potential changes.
My aim is to have a high pressure in front of radiator, slightly lower in engine bay area and identify even lower pressure areas under the vehicle so that I can use these areas to draw the air from the engine bay, I will also try and determine if bonnet vents will actually improve the situation.
Over the weekend I have moved my radiator back and pulled the bonnet down at the front as far as adjustment would allow, after a quick run this morning this has stopped the bonnet lifting at speed with no adverse effects to the cooling performance, if anything it actually ran a little cooler than normal.
Next thing is to start taking pressure measurements, I have also made an undertray that I intend to try.
I have fell into the trap of believing the more air I get into the engine bay the better things will be, I am now starting to doubt this. It originally suited me to have maximum clearance at the front of my bonnet as it allowed me to get my radiator in without fouling the bonnet. The down side of this is that at high speed the bonnet can be seen to lift and starts to move around - this suggests to me that I have a high pressure area under bonnet which in turn leads to poor airflow through the engine bay. After reading several articles I have decided to try and understand what is going on aerodynamically. I plan to take numerous pressure measurements around the front of the vehicle / engine bay / under chassis in a bid to come up with some potential changes.
My aim is to have a high pressure in front of radiator, slightly lower in engine bay area and identify even lower pressure areas under the vehicle so that I can use these areas to draw the air from the engine bay, I will also try and determine if bonnet vents will actually improve the situation.
Over the weekend I have moved my radiator back and pulled the bonnet down at the front as far as adjustment would allow, after a quick run this morning this has stopped the bonnet lifting at speed with no adverse effects to the cooling performance, if anything it actually ran a little cooler than normal.
Next thing is to start taking pressure measurements, I have also made an undertray that I intend to try.

If you have any idea's, comments or theories please let me know.........
Cold Air Intake
One of the down sides of fitting a larger radiator is that it restrict where you can get a good source of cold air for the intake. I had made do with a KN on the end of my plenum, only problem is that when idling and driving slowly the air intake temperatures climb quite rapidly, the air temperature sensor fitted in the plenum lets the ECU know whats going on which in turn backs off the ignition timing to prevent detonation, this can have a major effect on performance.
 Following numerous cardboard templates I have come up with something that seems to work quite well, I have fabricated an air box with filter that sits below the radiator.

This is fed cold air via a scoop that fits in front of the radiator

The air exits the air box via a 60mm outlet fitted to the rear and connected to the plenum via trunking.


 I don't expect a performance increase from any forced air effect but it should help overcome some of the restrictions of the filter and trunking. Having driven the car with the old and new intakes there is no noticeable difference in performance when travelling at speed.
Idle and low speed intake temperature's have drastically reduced, the next job is to move the air intake sensor into the air box as it does pick up a fair bit of heat soak in its current position - Its currently fitted on the underside of the plenum.
Following numerous cardboard templates I have come up with something that seems to work quite well, I have fabricated an air box with filter that sits below the radiator.This is fed cold air via a scoop that fits in front of the radiator
The air exits the air box via a 60mm outlet fitted to the rear and connected to the plenum via trunking.

I don't expect a performance increase from any forced air effect but it should help overcome some of the restrictions of the filter and trunking. Having driven the car with the old and new intakes there is no noticeable difference in performance when travelling at speed.Idle and low speed intake temperature's have drastically reduced, the next job is to move the air intake sensor into the air box as it does pick up a fair bit of heat soak in its current position - Its currently fitted on the underside of the plenum.
Thursday, May 3, 2007
Cooling Mods
Although the cooling system worked ok prior to my rebuild, I have tried to improve the set up to try and ensure I don't end up with trapped air in the system. I have basically added pipework from the header tank to the downstream side of the EWP. Originally this pipe went back into the head.

 This hose is fitted with a 4mm restrictor, the idea being that as the pump draws coolant, from the radiator and header tank, it creates a lower pressure in the header tank, this in turn should draw any air in the thermostat housing back into the header tank.
 Made up a couple of pipes that fix to the rocker cover studs to keep it all looking tidy. Unfortunately not very easy to see in this picture.

I have also moved the bleed from the top of the radiator to the thermostat housing.
This hose is fitted with a 4mm restrictor, the idea being that as the pump draws coolant, from the radiator and header tank, it creates a lower pressure in the header tank, this in turn should draw any air in the thermostat housing back into the header tank.Made up a couple of pipes that fix to the rocker cover studs to keep it all looking tidy. Unfortunately not very easy to see in this picture. The heater feed pipe (originally the heater return pipe into the back of the original water pump) is up stream of the EWP, with the heater valve closed all coolant flow is directed through the engine, with the valve open, some coolant flow will go through the heater and back to the header tank. All seems to work ok, just experimenting with water levels and pressure caps. Started with a 20 Psi cap but have now got this down to 13 Psi.
Sunday, March 25, 2007
Exhaust Manifold Clearance
Engine is now back in, re-wrapped the exhaust manifold and trial fitted it, with so much material removed from the block and the head - close to 1/4" - I had to create some clearance around the turret. This has always been close so out came the grinder - I could have raised the engine but its pretty tight at the top end between injectors and the bonnet.
 Spindles and butterfly's fitted, need to get hold of a couple of cap head bolts for the awkward manifold fixings

 Also had to put a bit of a flat on No. 1 primary so that it didn't foul the mounting boss on the block.
 Spindles and butterfly's fitted, need to get hold of a couple of cap head bolts for the awkward manifold fixings
Should hopefully be running this week if I get some time down the garage.........
Sunday, March 18, 2007
Engine Complete
My replacement cam arrived last week so I was able to finish off the rebuild on Saturday afternoon. I opted for a Newman PH3 300 degree duration cam, this had to be timed to achieve full inlet valve lift at 110 degrees after TDC. I initially set this up without the head fitted then rechecked when it was all assembled.

 I will fit the front pulley when the engine is back in, I currently have it at work as I am using it to make a boss to hold a 36-1 trigger wheel for a friends EFi conversion. Next job is to start putting the throttle bodies back together, these were stripped so that they could be ported and matched to the heads, i was thinking about making some new spindles and fitting sealing bushes but this can wait as I need to get the car mot'd at the start of April.
The rest of what can easily be fitted was bolted on ready for installation. Another mod that I have recently been looking into along with some friends was to add a supplementary oil supply to the main gallery at the front of the block - the idea being that it maintains equal oil pressure to all the main bearings. This is nothing new - we were just looking at a quick and easy way to try it. I wasn't going to fit it to my engine initially but following what we suspect to be front bearing failure (due to lack of oil pressure) on a friends car at the Silverstone trackday, I thought I might as well.

It's basically a feed from the oil filter housing directly to the front of the main oil gallery, It will be very difficult to establish if it makes any improvement but it should not have any detrimental effect, in theory it should help maintain an equal pressure along the gallery.
 Next job was to get the engine back in, as the gearbox and bonnet are still fitted, I thought I would treat myself to an engine load leveller to aid re-fitting the engine - set off down to machine mart at 4:30 yesterday only to find they had sold the one they had that morning - sods law - not to worry, I have now ordered one off the Internet that should be here Tuesday (cheaper as well).
I will fit the front pulley when the engine is back in, I currently have it at work as I am using it to make a boss to hold a 36-1 trigger wheel for a friends EFi conversion. Next job is to start putting the throttle bodies back together, these were stripped so that they could be ported and matched to the heads, i was thinking about making some new spindles and fitting sealing bushes but this can wait as I need to get the car mot'd at the start of April.Engine Stand
Following on from a question about my engine stand (another ebay bargain), here are a few pictures. I couldn't find a way of using the original brackets that came with the stand, they really needed to be mounted to the engine backplate - this doesn't help when you are trying to strip and rebuild an engine.


I have used the off side engine mounting bracket on the block with an additional 10mm steel plate, I offset the plate so that the centre of the stand is roughly in line with the middle of the block, this makes it very easy to rotate the block.
When fitting the engine to the stand, I found it easier to remove the rotating part of the stand along with the metal plate and fit this to the engine while it was being supported on the hoist, it was then just a case of lining the stand up with the mounting bracket spigot.

I did have concerns about the strength of the block casting, I initially trialled the brackets using a complete scrap 2500 engine with as much weight bolted to it as I could find, it all seemed to work ok but does become slightly more difficult to turn with a complete engine.
Sunday, March 11, 2007
Other Stuff / Cooling
Well the cam didn't arrive so it was time to get on with a couple of other jobs, had an oil leak from the diff pinion seal so decided now was a good time to get that sorted. The diff was another ebay bargain, a Spitfire 3.89 picked up locally for £25 - should have really changed the seal before putting it in, I was more interested to see if it was a better ratio than the 3.63 that I had originally fitted. Removed the prop to make the job easier, this will also help when I refit the engine - should give me a bit of room to pull the gearbox back.
Found this to be a good site for comparing rad sizes / outlet positions etc. etc. http://www.nissens.dk/uk/index.htm

I was already using an EWP (Electric Water Pump) so it was just a case of re-routing the bottom hose and turning the pump around. On the top hose I used a couple of 90 degree bends and some alloy tubing.

There is also an air bleed from the top of the rad, I routed this back to a custom made header tank mounted on the bulkhead - think this cost me about £40 of ebay.


One other point to make is that it is all quite tight to the bonnet line so if you are thinking of a similar conversion, you may need to adjust your bonnet to gain clearance.
Next job is to sort out a cold air intake, not sure if I'm going to stick with the standard plenum or go for filters fixed directly to the throttle bodies, this is something I will play around with if I get it on a rolling road later in the year.
Thought I'd also record what I had previously done on the cooling system, my original radiator started leaking so I looked at what else could be fitted, its all quite tight but I eventually ended up using a Golf Mk II radiator, cost me £50 (new) with the fan temp switch (alloy matrix with plastic end tanks). It has four bosses on the front so I made up a frame which lined up with these and the original rad mounts on the chassis. The frame was also later used to mount the cooling fan and rad cowl.
Found this to be a good site for comparing rad sizes / outlet positions etc. etc. http://www.nissens.dk/uk/index.htm
I was already using an EWP (Electric Water Pump) so it was just a case of re-routing the bottom hose and turning the pump around. On the top hose I used a couple of 90 degree bends and some alloy tubing.
There is also an air bleed from the top of the rad, I routed this back to a custom made header tank mounted on the bulkhead - think this cost me about £40 of ebay.

The whole set up seemed to work ok last summer, the only mod was to add a resistor to the EWP controller to make it cut in at a lower engine temperature. I tested the system by giving the car a good blast down the motorway on one of our "hot summer days" and then parked it in the garage and left it idling for 30 minutes, between the pump and the fan the temperature was controlled at around 95 degrees. Under normal conditions it runs at around 85 to 90 degrees.
I may play around with the fan position to see if it makes any difference with the fan behind the radiator but to be honest it works ok at the moment and it is quite nice to have it all hidden away at the front.
One other point to make is that it is all quite tight to the bonnet line so if you are thinking of a similar conversion, you may need to adjust your bonnet to gain clearance.
Next job is to sort out a cold air intake, not sure if I'm going to stick with the standard plenum or go for filters fixed directly to the throttle bodies, this is something I will play around with if I get it on a rolling road later in the year.
Friday, March 9, 2007
Slow Going........
Been a slow couple of weeks, piston and rods are now in place, these weight in at around 40 grams per cylinder lighter compared to standard rod and dome top piston.
 Unfortunately I had to return the new camshaft, just waiting for a replacement to arrive and that will be the bottom end complete. Spent a couple of evenings this week cleaning up the head.
New valves, double springs and alloy spacers now installed
 Head was ported and polished by a friend of mine, unleaded exhaust inserts fitted, new guides and inlet manifolds pinned and ported to match the head, looks great, the photo's don't really do it justice.
Unfortunately I had to return the new camshaft, just waiting for a replacement to arrive and that will be the bottom end complete. Spent a couple of evenings this week cleaning up the head.New valves, double springs and alloy spacers now installed

Head was ported and polished by a friend of mine, unleaded exhaust inserts fitted, new guides and inlet manifolds pinned and ported to match the head, looks great, the photo's don't really do it justice.
 Hopefully the cam may arrive in the morning and I can finish the build.....................
Sunday, February 25, 2007
Crank In
Not much spare time today to spend on my engine, managed to get a couple of hours earlier this evening to clean up the crank. Journals are all standard and in good condition, just a good clean up, and degrease. I have opted for Tri-Metal bearings which originally I was going to import from the the U.S. until I found out that the same bearing are available from County classed as their Heavy Duty bearings. With the bearings in place and smeared with superlube the crank was fitted and the end float checked and adjusted to 0.004".

Block Preparation
Spent most of Saturday afternoon preparing the block, lapped in the oil pump, used some valve grinding paste to ensue a good seal between the pump and the block. Checked the piston ring gaps, these all came out out 0.010" to 0.012", a little higher than I would have liked but within spec.
Then commenced the clean, although the block had been in the cleaning tank at the machine shop, I was not entirely happy with the with the coolant passages, Following some advice given on one of the Club Triumph message boards, I managed to get hold of some Milk Stone Remover, this is used within the dairy trade for descaling pipes and cleaning equipment. It is based on Phosphoric Acid which is used in rust removal products. I mixed this with hot water, filled the block cooling system and left it to soak for 30 minutes - care must be taken when filling the block to ensure it doest spill on to any machined surface as it is corrosive. I then set to work with the steam cleaner to remove all traces of the solution - the results were pretty impressive.
After blowing of most of the water I set to work with the paraffin gun and airline to ensure things were as clean as possible - this was then dried off and the whole block treated to a can of brake cleaner to ensure it was completely degreased prior to a coat of gloss black engine paint.
Finally the core plugs were fitted with a smear of Loctite 648 retaining fluid.
The whole process may seem like a bit of an overkill but I like to ensure that engines are built as clean as possible.
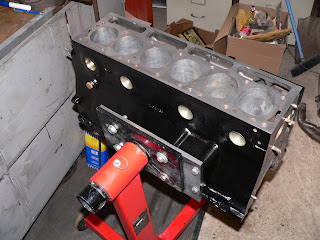
Then commenced the clean, although the block had been in the cleaning tank at the machine shop, I was not entirely happy with the with the coolant passages, Following some advice given on one of the Club Triumph message boards, I managed to get hold of some Milk Stone Remover, this is used within the dairy trade for descaling pipes and cleaning equipment. It is based on Phosphoric Acid which is used in rust removal products. I mixed this with hot water, filled the block cooling system and left it to soak for 30 minutes - care must be taken when filling the block to ensure it doest spill on to any machined surface as it is corrosive. I then set to work with the steam cleaner to remove all traces of the solution - the results were pretty impressive.
After blowing of most of the water I set to work with the paraffin gun and airline to ensure things were as clean as possible - this was then dried off and the whole block treated to a can of brake cleaner to ensure it was completely degreased prior to a coat of gloss black engine paint.
Finally the core plugs were fitted with a smear of Loctite 648 retaining fluid.
The whole process may seem like a bit of an overkill but I like to ensure that engines are built as clean as possible.
Friday, February 23, 2007
Engine Rebuild
Just about to start my engine rebuild so I thought I record what bits were going in......
Engine mods for the 2 litre are fairly well documented, my engine spec is based on some pretty standard modifications. I wanted to build something that would give me a noticeable improvement in power and remain reliable, only time will tell if achieve this.
Block rebored +0.020" and skimmed by 0.035"


2500S Head ported and polished

Engine mods for the 2 litre are fairly well documented, my engine spec is based on some pretty standard modifications. I wanted to build something that would give me a noticeable improvement in power and remain reliable, only time will tell if achieve this.
Block rebored +0.020" and skimmed by 0.035"
Spitfire +0.060" pistons, 0.010" proud of bore (Originally an ebay bargain but ended up being expensive when I realised I needed to have circlip grooves machined)
Lightened flywheel
Crank, flywheel and damper balanced
Newman camshaft
Blueprinted oil pump
Lightened flywheel
Crank, flywheel and damper balanced
Newman camshaft
Blueprinted oil pump
Con rods lightened, balanced and shot penned
Cosworth con rod bolts (std shown along side)
2500S Head ported and polished
Larger inlet & exhaust valves
Head skimmed by 0.210" to achieve 10.3:1 compression ratio
Throttle bodies ported to match head
6-3-1 Exhaust manifold ported to match head.
Head skimmed by 0.210" to achieve 10.3:1 compression ratio
Throttle bodies ported to match head
6-3-1 Exhaust manifold ported to match head.
Friday, February 16, 2007
Welcome
Welcome to my blog, my plan is to record modifications and improvements already completed and capture new ideas and modifications as they are carried out.
After a number of years in bits and pieces spread around in various garages, I finally completed the restoration and rebuild of my GT6 Convertible in March 2006. In addition to a complete restoration, one of the major modifications I made was to install an engine management system to look after fueling and ignition.
I ran the car for most of last summer to gain confidence in the management system which proved to be totally reliable.
Although fairly lively, a drive in Karl Dandrige's (KD Triumph) Vitesse fitted with his GT6 race engine convinced me of the need for further improvement.......
Apart from the management system, the original engine was a pretty standard 2 litre with dome top pistons.
Over the winter I decided it was time to concentrate on the engine hardware, over the coming weeks I will update my blog with the details of the engine rebuild.

After a number of years in bits and pieces spread around in various garages, I finally completed the restoration and rebuild of my GT6 Convertible in March 2006. In addition to a complete restoration, one of the major modifications I made was to install an engine management system to look after fueling and ignition.
I ran the car for most of last summer to gain confidence in the management system which proved to be totally reliable.
Although fairly lively, a drive in Karl Dandrige's (KD Triumph) Vitesse fitted with his GT6 race engine convinced me of the need for further improvement.......
Apart from the management system, the original engine was a pretty standard 2 litre with dome top pistons.
Over the winter I decided it was time to concentrate on the engine hardware, over the coming weeks I will update my blog with the details of the engine rebuild.

Subscribe to:
Posts (Atom)